Hangfire is great for scheduled tasks. I have used Hangfire all the way back to Umbraco 7 and plan on continuing to use it for Umbraco 9.
You do not have to use Hangfire for scheduled tasks in Umbraco 9 and I have written a related blog article called ‘Scheduled or Recurring Tasks in Umbraco 9’ which explains how to get u and running without using Hangfire.
With that said though, I do recommend Hangfire. It simply works great, is easy to configurable and a lot more powerful than the ‘out of the box’ .Net Core RecurringHostedServices. Another good reason to use Hangfire is that it has a dashboard where you can monitor your scheduled tasks and even manually trigger them. In addition to this you can also embed the Hangfire dashboard within the Umbraco backend which is a great bonus.
Installing Hangfire on Umbraco 9
The only negative about Hangfire is there is quite a few steps to initially getting up and running and there are no quick plug and play packages to do this. With that said though, this article should guide you through the process quite easily.
Carefully follow the steps below to get up and running within 30 minutes.
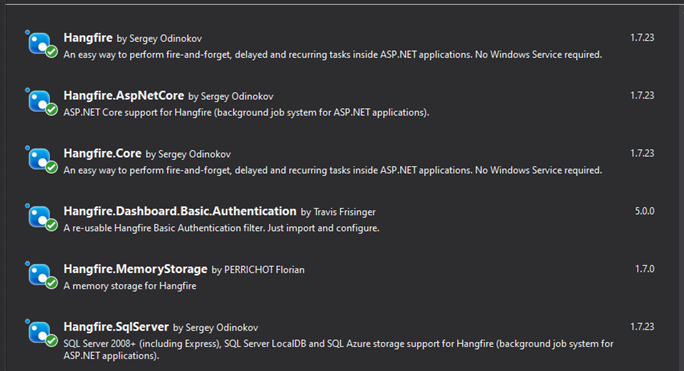
Step 1 - Installing Hangfire Nuget Packages
Install all the following Nuget packages.
Step 2 - Add your scheduled tasks and inject them in your application
Create a class to store your scheduled tasks. This can be pretty much the same as when your create a custom helper or service. If you need help with this then I wrote a related article called 'How to compose a custom service in Umbraco 9' which will explain how to create a custom service and inject it into your application.
*Before progressing any further I recommend reading through both related articles.
Here is an example a very basic task which I will schedule with Hangfire further down in the article.
using Microsoft.Extensions.Logging;
using System;
using System.Threading.Tasks;

namespace Website.Core.Events
{
     public interface IHangfireTasks
     {
          Task<bool> TestScheduledTask();
     }

     public class HangfireTasks : IHangfireTasks
     {
          private readonly ILogger<HangfireTasks> _logger;

          public HangfireTasks(ILogger<HangfireTasks> logger)
          {
               _logger = logger;
          }

          public async Task<bool> TestScheduledTask()
          {
               try
               {
                    _logger.LogInformation("TestScheduledTask - Started");

                    //some code to go here
                    //await ......

                    _logger.LogInformation("TestScheduledTask - Finished");

                    return true;
               }
               catch (Exception e)
               {
                    _logger.LogError(e, "Index | Exception: {0} | Message: {1} | Stack Trace: {2}", e.InnerException != null ? e.InnerException.ToString() : "", e.Message != null ? e.Message.ToString() : "", e.StackTrace);
               }

               return false;
          }
     }
}
Here is an example of how I injected this into my application
Please note my preference on this is to create a extension method. If you read the two related articles above then you would have found details information on this in the 'Creating an extension method for IUmbracoBuilder and injecting a collection into startup.cs' section.
using Microsoft.Extensions.DependencyInjection; using Umbraco.Cms.Core.DependencyInjection; using Umbraco.Cms.Core.Notifications;
namespace Website.Core.Events { public static class EventExtensions { public static IUmbracoBuilder AddEvents(this IUmbracoBuilder builder) { builder .AddNotificationHandler<ContentPublishingNotification, PublishingEvent>() .AddNotificationHandler<ContentPublishedNotification, PublishedEvent>() .AddNotificationHandler<ContentMovedToRecycleBinNotification, ContentMovedToRecycleBinEvent>();
Step 3 - Adding some Hangfire config to the startup.cs / ConfigureServices Method
Take a look at my ConfigureServices method configuration. You will notice there is some Hangfire configuration inside the region I created. This is what you will need to add into your project.
public void ConfigureServices(IServiceCollection services)
{
     #pragma warning disable IDE0022 // Use expression body for methods

     services.AddUmbraco(_env, _config)
     .AddBackOffice()
     .AddWebsite()
     .AddComposers()
     .AddServices()
     .AddEvents()
      .Build();

     #region Configure Hangfire

     services.AddHangfire(c => c.UseSqlServerStorage(_config.GetConnectionString("umbracoDbDSN")));
     GlobalConfiguration.Configuration.UseSqlServerStorage(_config.GetConnectionString("umbracoDbDSN")).WithJobExpirationTimeout(TimeSpan.FromDays(7));

     #endregion

     #pragma warning restore IDE0022 // Use expression body for methods
}
Step 4 - Add some Hangfire config to the startup.cs / Configure Method
Step 5 - Run the project and test your scheduled task
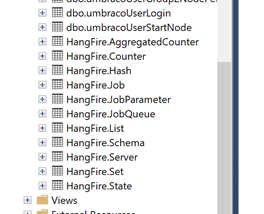
That should be it. Run your project and do some testing. If everything is as expected you will notice some new database tables get added to your database.
That, and the scheduled task should also fire.
If you are having problems and this still isn't working I am pretty sure if you go back through the article step by step everything should be there to get you up and running.
Failing that please feel free to get in contact and I am happy to help out. You can either find me on LinkedIn or drop a comment below.
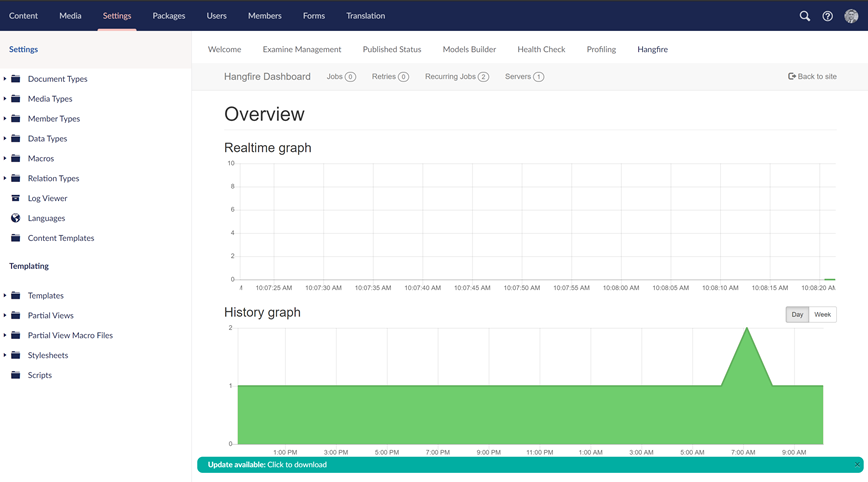
Extras - Hangfire Dashboard
Enabling the Hangfire Dashboard in Umbraco 9
To enable the Hangfire Dashboard in Umbraco 9 you simply need to add an extra configuration value to the appsettings.json file. In the global section simply add a reserved path the same as below.
//Basic Authentication added to access the Hangfire Dashboard
app.UseHangfireDashboard("/hangfire", new DashboardOptions()
{
     AppPath = null,
     DashboardTitle = "Hangfire Dashboard",
     Authorization = new[]{
     new HangfireCustomBasicAuthenticationFilter{
          User = _config.GetSection("HangfireCredentials:UserName").Value,
          Pass = _config.GetSection("HangfireCredentials:Password").Value
}
},
     //Authorization = new[] { new DashboardNoAuthorizationFilter() },
     //IgnoreAntiforgeryToken = true
});
If you re-build you project, run, and test the '~/hangfire' url again you will notice it now requires the username and password you stored in the appsettings.config file.
Things I wanted to get working but didn't quite figure out.
When I used Hangfire in the past for Umbraco 7 & 8 I managed to figure out how to authorize based on the Umbraco memer. So if you were logged into the backend the '~/hangfire' working and if you were logged out it didn't
I tried to get this working for Umbraco 9 and made some good progress but just couldn't get this to work. I think I will revisit this in the future when there is more documentation available for Umbraco 9.
With that said though, If anyone has any ideas please comment below and I will give this another go.
Here is what I got so far.
I added this code to the ConfigureServices method in the Startup.cs file.
I then replaced the authorization code in the Configure method in the Startup.cs file.
//Umbraco User Authentication
app.UseHangfireDashboard(
     pathMatch: "/hangfire",
     options: new DashboardOptions()
     {
           Authorization = new IDashboardAuthorizationFilter[] {
           new HangfireAuthorizationFilter("umbracoUserAuthorizedPolicy")
      }
});
I then created a DashboardAuthorizationFilter
using Hangfire.Annotations;
using Hangfire.Dashboard;
using Microsoft.AspNetCore.Authorization;
using Microsoft.Extensions.DependencyInjection;

namespace Website.Core.Utils
{
     public class HangfireAuthorizationFilter : IDashboardAuthorizationFilter
     {
          private string policyName;

          public HangfireAuthorizationFilter(string policyName)
          {
               this.policyName = policyName;
          }

          public bool Authorize([NotNull] DashboardContext context)
          {
               var httpContext = context.GetHttpContext();
               var authService = httpContext.RequestServices.GetRequiredService<IAuthorizationService>();
               bool success = authService.AuthorizeAsync(httpContext.User,        this.policyName).ConfigureAwait(false).GetAwaiter().GetResult().Succeeded;
               return success;
          }
     }
}
The problems I encountered is I just could not get the user in the context to check to see if they are logged in.
Installing Hangfire Dashboard In Umbraco 9 Custom Section
I'm an entrepreneur and web developer with a passion for coding. I absolutely love working with Umbraco CMS and appreciate the Umbraco community even more.
I've got 10 years+ .Net experience and 7 years+ experience working in the recruitment industry, both coding and marketing job websites. I wanted to use my skills to help give something back to this awesome community and so I decided to build UmbraJobs.com.
My vision & fundamentals
I want this website to be a place where Umbraco Professionals and Umbraco Partners can advertise their services but at the same time I want to filter out all the under-qualified freelancers & agencies that take up the biggest part of other job & freelancer websites. We've all worked hard to gain our Umbraco certifications, partnership status, and help build the Umbraco community to what it is today. I want to see everyone get rewarded for their efforts.
Follow me on social media
If you're an Umbraco professional, partner, employer, recruiter or a passionate Umbraco community builder then I'm more than happy to hear from you. Follow me on my social media channels and please reach out if you have any needs, want help or consultation with anything Umbraco related or just want a general chat.
Need help with a project but not too sure who to approach? Send us your project brief and budget. We will provide a free consultation and can help you gather quotes from the best and most suitable freelancers or agencies.
Have you got job vacancy and want to hire an Umbraco professional? Post a job on our website for free. Alternatively let us know your requirements and we will send suitable prospects your way.
Are you an Umbraco Freelance Developer or Umbraco partner that wants to advertise on our site? If you work with Umbraco or registered as an Umbraco partner then you can create a profile for free.